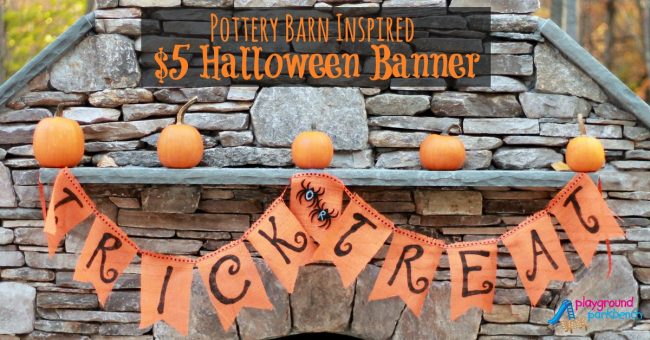
Who else loves paging through the Pottery Barn catalog? I certainly do. However, the hubby definitely doesn’t care for the price tags associated with it. So I limit myself to using it as inspiration, and love it when I can create something, with help from the kids, for a fraction of what they are selling something for! Our latest inspired by Pottery Barn DIY project was a Halloween Banner for our mantle. Kid-painted, mom assembled, and for about $5 worth of materials vs. the $30 PB version!
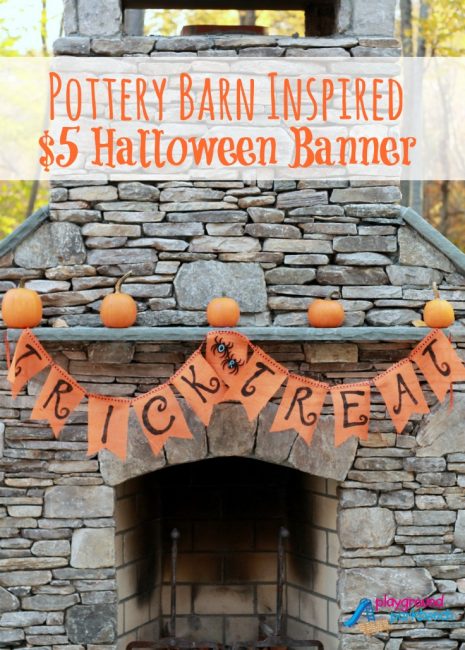
$5 Halloween Banner
Not bad for $5, right? For $5 of consumed materials you can pull this off – no sewing required, and my 4 year old did the stenciling!
Supplies
1/2 yard orange burlap ($1.50)
Black acrylic paint ($2)
Decorative ribbon ($1.50)
For use again:
Letter stencils
Round sponge brushes
Fun Chalk markers
Hot glue
Cost: About $5 for consumed materials
Prep Time: Less than 15 minutes
Clean-Up Time: Less than 5 minutes
Create a Template
I cut the pieces of burlap using a piece of cardstock for a template. It was an 8.5 x 11 piece of letter paper. I folded it in half, then cut out the notch in the bottom, and used it to cut 11 pieces of burlap for our banner. I cut the pieces from the stitched edge to help prevent excess fraying once it was cut. I would also recommend cutting a sheet of paper to go underneath each piece of burlap for stenciling.
Kid-Stenciled
I set Big M, my 4 year old, up to stencil the letters on the cut burlap. For ease of clean-up, I laid down part of a Dollar Store table cloth, and put the paint on a paper plate. I used painter’s tape to tape the stencil to the burlap, and gave her a round sponge brush to apply the paint. She’s currently doing a Letter of the Week at preschool, and loved counting up how many of each letter we needed!
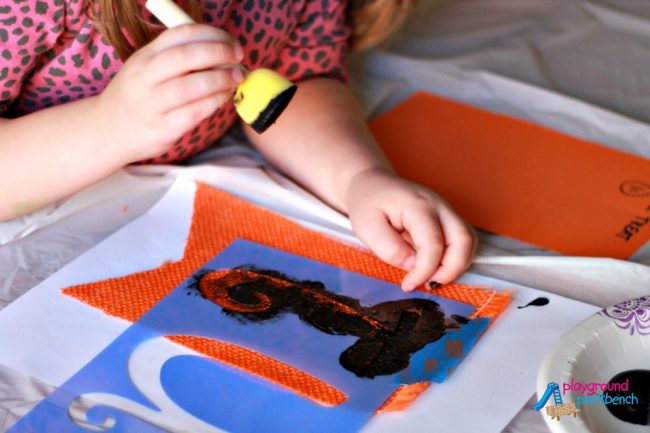
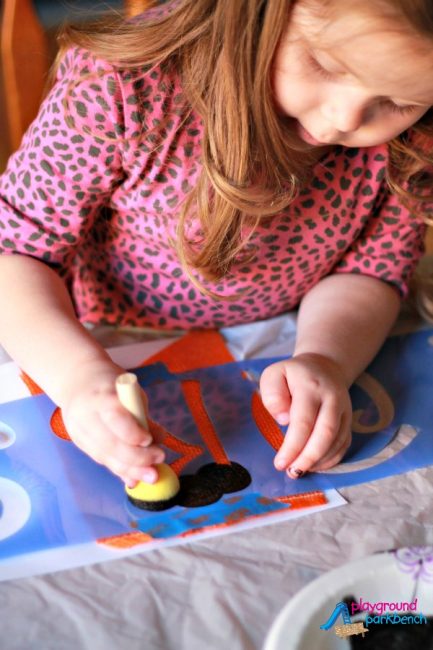
She got through about 3/4s of all the letters before moving on and leaving it to me to finish. For the ‘or’ in the middle, I used 2 felt spiders we had leftover from another project and our favorite chalk marker, Fun Chalk, in white, to write OR.

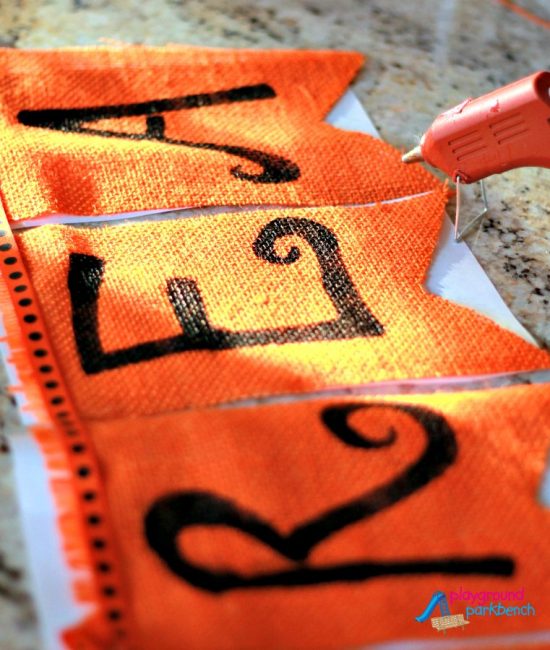
Mom-Assembled
After allowing the stenciled letters to dry overnight, I assembled the banner the next morning. No sewing required. I picked up a decorative ribbon at Hobby Lobby during one of their 40% off all Halloween items sales. Leaving about a foot of length at the end, I applied the ribbon across the top stitched edge of the burlap with hot glue. I love my hot glue gun!
Voila!
It looked great across the outdoor fireplace with our family of pumpkins…

… but the Ms preferred it indoors!

It makes a great addition to the mantle along with our DIY Fall Leaf Garland. Burlap is rapidly becoming one of my favorite crafting mediums! Be sure to check out our Kidmade Burlap Banners for Christmas and July 4th too!
How do you decorate for Halloween? I love how proud Big M is when she helps contribute to our home decor – she points it out to everyone!
If you enjoyed this post, you might also enjoy our DIY Fall Leaf Garland and DIY Personalized Coasters. You can find all of these, as well as our favorites from around the web on our DIY/Crafts for Grown Ups board on Pinterest.
2 comments
[…] Spiderweb Garland DIY Glitter Pumpkins Halloween Wooden Peg Dolls DIY Spider Halloween Wreath Pottery Barn DIY Halloween Banner Giant Spooky Ghost Decorative Pumpkins With NO Mess Quick Spider Decorations Mod Roc Ghost Light […]
[…] knew from our Trick or Treat holiday banner that 11 pennants fit perfectly across my mantle. You may want to measure where you want to hang […]