
Big M, at 3.5, has become increasingly interested in the concept of days and times. When she is awaiting a holiday or Grandma coming to visit, she will ask what day it is happening, and then everyday ask if it is that day yet! Similarly, she has picked up on when Bubble Guppies, her favorite show, says they are airing a NEW show on Friday, she will ask me everyday if it is Friday yet. We have many recurring regular weekly activities as well, such as preschool and ballet, and she recognizes days based on the activity of the day. I decided it would be a great time to introduce the concept of the calendar to her to help answer many of her questions, but when I searched online, I couldn’t find exactly what I wanted. So, I set out to create my very own, Weekly Magnet Calendar.
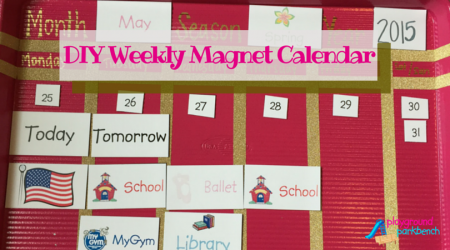
DIY Weekly Magnet Calendar
This was not the least expensive DIY project I’ve ever created – but Big M and I both are thrilled with the end result. The most expensive component, by far at $25, was the baking sheet we used as the metal background. I wanted a large enough sheet that I could fit the business card size magnets across for each day – the biggest I found doesn’t quite fit all 7 across, but it was enough to get our weekday routine on there.
Supplies:
Large, magnetic baking sheet – 21″ x 15″
Avery Business Cards printable
Adhesive Business Card Magnets
Krylon Spray Paint (your choice of color)
Sharpie Paint Pen (your choice of contrasting color)
Washi Tape (your choice of color)
Scissors
Ribbon (optional)
Hot Glue
Small, zippered bagCost: Less than $50
Prep Time: 1-2 hours
Clean-Up Time: Less than 10 minutes

PGPB Guru Tip: Not all baking sheets are magnetic. Many, non-stick varieties are made of aluminum, which is NOT magnetic.
Making the Calendar
You will need a large baking sheet for the magnetic base of your calendar. It was very hard to discern online exactly what type of metal a baking sheet was, so I ended up going to Bed, Bath and Beyond and actually testing magnets on the sheet in the store to make sure I bought one that would work! I was also able to find a bigger sheet in the store, than anything I found on Amazon.
I did the spray painting outdoors on an opened up box. I only spray painted the front side of the baking sheet. You could also leave the sheet unpainted, but thought it would be fun to give it a little pop of color. I opted for a bright pink, to be paired with gold accents. I applied 3 light coats of Krylon ColorMaster spray paint to get complete, even coverage.

After letting it dry overnight, I used a ruler, washi tape and paint pen to create the calendar structure, leaving spaces for the month, season and year, as well as the days of the week. I left the bulk of the space below the days of the week to allow room to place the date magnets, as well as any daily activities.
Making the Magnets
Making the magnets themselves was super easy, thanks to perforated business card printable templates from Avery and adhesive business card magnets. In MS Word, I just selected the appropriate template for my Avery card printables, and added clip-art and typed into the tables the various magnets I wanted to create. I made a magnet for every month of the year, each of the four seasons, all the major holidays, and finally our regular activities, like school, ballet, library, MyGym, etc.
I also made magnets for Birthdays, and inserting a 2×3 table within each card, created smaller magnets for each date of the month, numbers 1 through 31. One of the concepts Big M has been most occupied with is the idea of today, tomorrow and yesterday, so I created magnets with each of those as well.
The adhesive magnets have a backing on the front, that peels off, and then the printed business card easily adheres to the magnet. They are also readily cut with scissors, if you want to trim them, cut them in half, or in the case of the numbered dates, cut one magnet into 6 squares.
If you prefer, you can also write out the magnets you want too on the Avery template. They don’t have to be printed on a computer. Your kids can help you draw pictures and write out the various months, holidays and activities.

Hanging and Storage
Since we are getting ready to move and don’t want to make any new holes in the wall, I haven’t hung our calendar yet. But, I do plan to hot glue ribbon to the top to hang it with, and add a Command Hook to a front corner to hang our zippered pouch. I have a monthly glam bag subscription with Ipsy, which has left me with a plethora of zippered make-up bags, perfect for storing little pieces. All our extra magnets fit perfectly inside one, and it has a loop which can hang from a hook. You could also just stick them all on the reverse side of the tray.
Daily Calendar Update
Big M helped me with our initial calendar set-up, putting on the month, season and year, as well as the dates for this week and our daily activities. Now, each night, we shift the yesterday, today and tomorrow magnets, and talk about what activities are happening the next day and coming up later in the week. It’s been fun watching her play with the physical calendar parts and begin to crystallize what up until this point have just seemed like abstract concepts of days and times.

Does your child express interest in dates, times and when special events are coming up? I am so thrilled with how well this DIY project turned out, and more importantly, how much Big M has enjoyed using it as a tool to answer all her questions. How do you keep track of weekly activities in your house?
If you enjoyed this project, be sure to follow our Preschool board on Pinterest for more great ideas for projects and activities for your preschooler.
Follow Meghan @ PlaygroundParkbench’s board Preschool (3-5 years) on Pinterest.
10 comments
[…] DIY Magnetic Calendar […]
[…] DIY Weekly Magnetic Calendar […]
[…] Do you need to organize your kids? Make this magnetic weekly calendar for them – they’ll love using it and everyone will know what is […]
[…] like to seize on her enthusiasm. Last Spring, when she was fascinated by the calendar, we made a DIY Weekly Magnet Calendar. So now, seizing her interest in the subject, I created a simple, printable book for teaching place […]
[…] Organize your weekly family schedule with a DIY magnet calendar by Playground Park Bench. It’s a great way to teach children about the calendar […]
[…] Use a Magnet Calendar for Weekly Activities – Stay on top of changing in-school “specials” days and after-school activities with a DIY Magnet Calendar like this one featured on Playground Parkbench. […]
This is so pretty! We have a calendar, but it’s much more simple 🙂 It’s a magnetic white board, so I can write on it and place magnets (similar to yours – but MUCH smaller) on it. My son was asking all the same questions about the days!
Thanks! Yeah, everything I kept finding online was either monthly or the magnets were tiny – she’s getting more into wanting to read, learn words, so I wanted to be able to include images and labels on each magnet. But that’s cool that you can write on it!
Love this! Adding the pink spraypaint makes all of the difference!
Thanks! It’s been great to have a physical resource to refer to for all her “what day is it” questions.